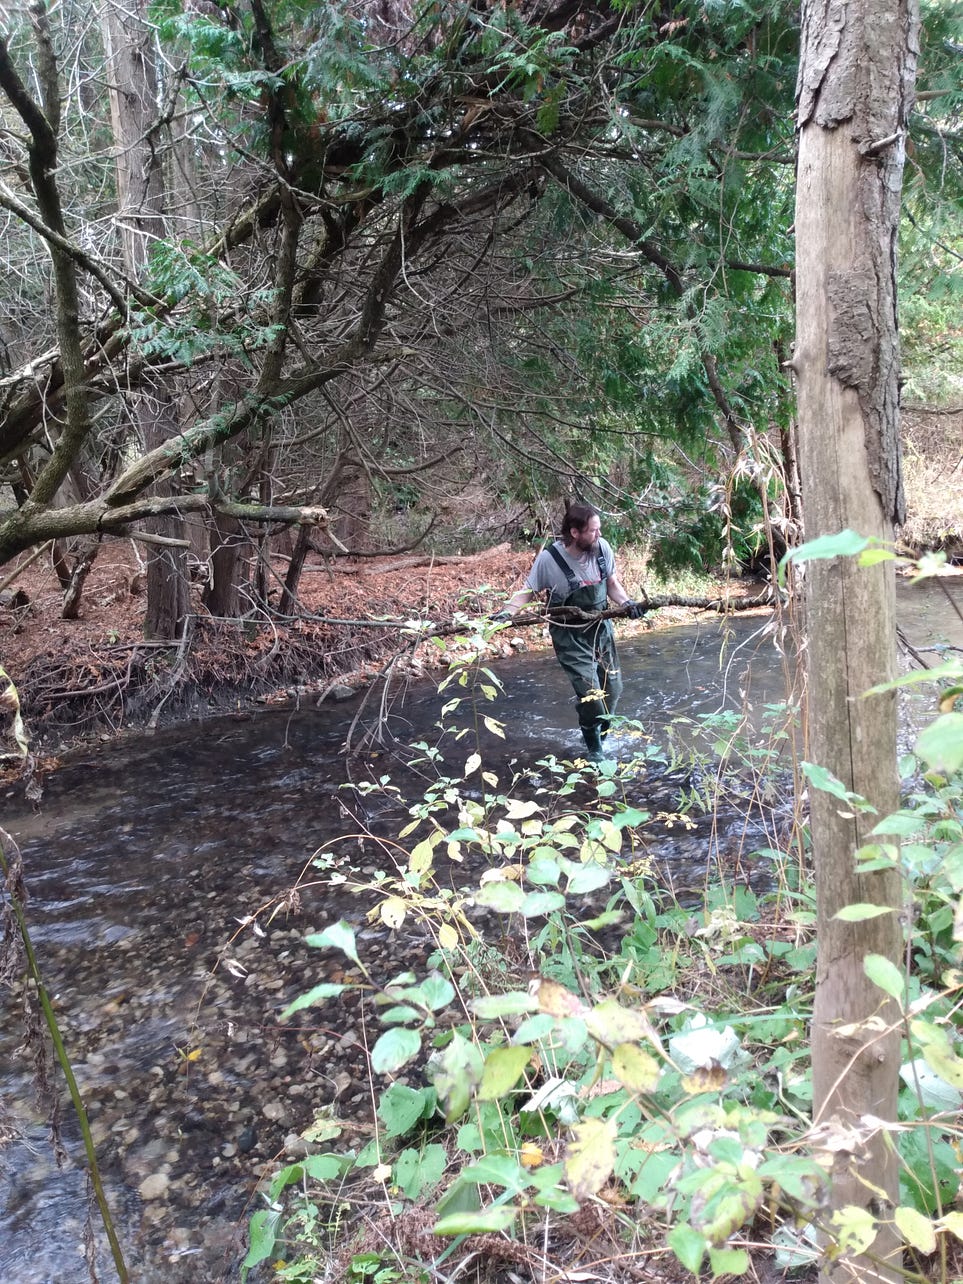
Making a path through debris in the river for the trout to spawn upstream
Ben assessing the debris in the river. photo by Lynne Collier
One of the responsibilities we’ve taken on here at the Shire is to care for the river, making sure it runs clean and clear of debris. Partly because we have two varieties of trout who swim up our section of this river to spawn.
Each spring, and often after a storm, we survey the health of the river to see what needs doing and then decide who’s doing what. As my husband and I are getting a bit older (ahem), our son now has the task of donning waders and jumping into the murky water.
We all used to do this and I actually quite enjoyed it. I searched for a long straight branch that had fallen to help unplug the twigs and leaves that had swept downstream in the spring thaw or a summer thunderstorm.
I couldn’t find waders in my size, so I wore rubber boots (affectionately known as wellies from my childhood in England) or waterproof sandals. Now, I’m delegated to a lookout and emergency contact riverbank supervisor.
I couldn’t find a long straight stick this year, so my husband duck-taped a paint roller head onto a broom handle. I can break up a pile of debris from seven feet away!
Our son is the one who now wades waist-deep in the water and throws large tree trunks onto the riverbank.
Ben tossing the fallen trees. Photo by Lynne Collier
The reward for all his effort is my squeals of joy as we see the first fish swim successfully up the river. It’s such a good feeling to be able to help nature continue to thrive here.
We have two types of trout in our river. Brook Trout and the occasional Rainbow Trout. They journey north through our woodland river from Lake Ontario to spawn in spring and some will come again in late autumn. That’s why we need to clear the river diligently twice each year.
It’s so worth the sight!
’Til next time — thank you for reading, and remember you are loved by the One who created you in His image.
How an armful of yard clean-up became a new creation
As I wondered how to dispose of dead vines I’d gathered in autumn from the trees in our backyard, I wrapped an extra long one around my arm to carry it to the fire pit. I had a thick circle of dried vine by the time I got there.
I thought it looked like the base for a lovely Christmas wreath!
The dead and withered vine, choking our trees and therefore destined for the fire, suddenly had a new life and a more beautiful purpose. I made three wreaths that year. One for myself and one each for my two daughters.
They looked delightful, wrapped in tartan ribbon and tied in a bow with leaves from our evergreen trees.
In 2 Corinthians, God tells us that He reconciled Himself to the world through the death and resurrection of His Son, Jesus Christ. God no longer counts our sins against us.
If we are in Christ, we are a new creation. The old person is dead to sin, and the new person is alive in Christ. We, too, have a new life and a more beautiful purpose.
“Therefore, if anyone is in Christ, he is a new creation; the old has gone, the new has come!” (2 Corinthians 5:17).
Do you feel like a new creation? If not, ask God to reveal Himself as you walk with Him today. What old things do you see that are made new? Perhaps a lovely garden container from found evergreen branches and pine cones. Or a treasured old piece of furniture painted and made into garden art?
If we can transform old things which seem of little worth, how much more can our loving God transform us?
Prayer: Heavenly Father, transform me into the image of my Lord and Saviour, Jesus Christ, Your Son. Show me that I am a new person because of Him.
Continued reading: 2 Corinthians 5: 11-21.
’Til next time —thank you for reading, and remember you are loved by the One who created you in His image. Merry Christmas, everyone! 💜🎂🩷
~ Lynne
*This devotion was initially posted in Koinonia on my Medium profile.
Terrance Hayes introduced this poetry style based on a poem by Gwendolyn Brooks. I read about it in Robert Lee Brewer’s Smash Poetry Journal. I like it when Lee challenges his readers to try new poetic styles and encourages them to create something different.
The rules of this style of poetry are simple:
· Take a line from a poem you wrote or read
· Use each word in the line as the end word in your new poem
· Keep the end words in order
I’d read a stirring poem by David Hollis on Medium that morning, so I chose this line from the poem as my new poem —
“Imagine if we swam against the tide of popular culture.”
Using each word as an end word, I wrote this new poem.
I hope you enjoyed reading this poetic form. I enjoyed writing it and intend to write more in this style. Have you heard of this style before? I hope you’ll try it out if it’s new to you.
’Til next time — remember you are loved by the One who created you in His image.
~ Lynne
This poem was originally published on Medium in the publication Koinonia
Gregory K. Pincus founded Fibonacci poetry (The Fib) in 2007. It’s a six-line poem that follows the Fibonacci sequence of plus one extra syllable for each line so that the number of syllables in each line equals the total number of syllables in the preceding two lines.
In a mathematical form, it looks like this: 1/1/2/3/5/8.
Today’s challenge was to carry the Fib further and write a poem of 8 lines, which finishes with the last line being fifty-five syllables long. I’ve enjoyed writing several poems using his book but was tempted to skip this page!
The mathematical form for this is 1/1/2/3/5/8/13/21/34/55.
However, I persevered, and I think I got it right. Please feel free to count the syllables and let me know if I slipped up anywhere. (A sneaky way to gain extra read time there).
I further challenged myself to write it as a continuous sentence. My apologies to editors everywhere.
Here goes.
The Big Fib
The
prompt
today
was to write
a longer poem
using the Fibonacci style
which adds one more syllable to each line that’s written
so that by the time you’ve written the tenth line, you will have a line that has fifty-five
syllables in total in a sequence of an elaborate poetic style that has driven you slightly insane trying to figure
it out and leaves you wondering why you ever made a pact with yourself to do this crazy thing in the first place and what idiotic kind of poem you will end up with when all is said and done — tell me, how did I do?
’Til next time — remember you are loved by the One who created you in His image.